Wednesday, March 2, 2011

Exchange Server 2007: Bulk creation of mailboxes using Exchange Management Shell

Bulk creation of mailboxes (and the accompanying user accounts) in Exchange Server 2003/2000 involved some elaborate scripting effort. This task can now be done fairly effortlessly, thanks to the Exchange Management Shell (EMS). The Shell can very easily import/use CSV files saved from a spreadsheet or text editor and create the mailbox-enabled users. Here’s how.

Step 1 Create a spreadsheet

Create a spreadsheet (you can also use a standard text editor such as Notepad to create a CSV file) with the following columns. You can add more fields if you wish:
Alias,Name,UPN
Add data for new accounts in following lines/rows. Here’s what it’ll look like:
Alias,Name,UPN
User_One,User One,userone@yourUPNsuffix.com
User_Two,User Two,usertwo@yourUPNsuffix.com
User_Three,User Three,userthree@yourUPNsuffix.com
Save the file as CSV – let’s call it CreateRecipients.csv

Step 2 Enter a password

Now fire up the Shell (EMS) and issue the following command:
$Password=Read-Host “Enter Password” -AsSecureString
This will prompt you for a password. The same password will be used as the initial password for all your mailbox-enabled users.

Step 3 Import the CSV and create mailboxes

Next, issue the following command to import the CSV file and create the user accounts and mailboxes:
Import-CSV CreateRecipients.csv | ForEach {New-Mailbox -Alias $_.alias -Name $_.name -userPrincipalName $_.UPN -Database “Mailbox Database” -OrganizationalUnit Users -Password $Password}

How the Shell interprets the command

Here’s how the shell interprets the above command:
  • Import-csv CreateRecipeints.csv gets data from the CSV file.
    If you’re providing the complete path with spaces, you must enclose it in quotes. For example: “c:\My Scripts\CreateRecipients.csv”.
    - If you’re not running the command from the same directory (folder) where the CSV file is located, you will need to provide the complete path to the file.
  • - The | pipes the data from the CSV to the next command.
  • - foreach parses through each line in your CSV file, using the first row as a header. All the column headings/names get treated as field names.
  • - The New-Mailbox command, as you may already know by now, creates a new mailbox-enabled user.
  • - For each variable, you either enter a value at the command line (for instance, we’re using the value “Mailbox Database” for the Store), or you can pick up the value from your CSV file provided you have a column for it with a heading. For instance, for the -alias field, we use $_.alias – which tells the script to look for the column called alias in your CSV file and pick up the value from the current row or line.
    If you’re running the command on the same server where you want to create the mailboxes, you can simply use the Store name, e.g. “Mailbox Store”. To create mailboxes on another server’s Store(s), you can use either ServerName\Store, or ServerName\StorageGroup\Store, or even the GUID of the Store. How do you get those??? Use the Get-MailboxDatabase cmdlet.
  • - The -OrganizationalUnit field stands for (Active Directory) OU (or Container) you want to create the accounts in. If all the accounts you create from the CSV file will reside in the same container or OU, you can provide this at the command-line, as we did in the example above. Alternatively, you can include the OU/Container name in your spreadsheet/CSV file in a field – let’s say OU – and modify your command to say: -org $_.OU
    Note: Luckily you do not need to provide the distinguishedName of the OU or Container – simply the name of the OU or Container works.
  • - The -password field picks up the password from the variable called $password that we created earlier.
The New-Mailbox cmdlet allows you to enter a lot of attributes for each mailbox-enabled user. These are documented in the New-Mailbox cmdlet reference docs (Exchange 2007 | Exchange 2010), and also in the Exchange 2007/2010 online help. For each attribute you want to populate, add it to your spreadsheet/CSV file.

To create new mailboxes with settings based on an existing mailbox, use the TemplateInstance parameter, as shown in the following commands:
$Template = Get-Mailbox “Template Mailbox”
Import-CSV CreateRecipients.csv | foreach {new-mailbox -alias $_.alias -name $_.name -userPrincipalName $_.UPN -database “Mailbox Database” -org Users -Password $Password -templateinstance $Template}

NOTE: The TemplateInstance parameter is not supported in Exchange 2010

Reference:

http://exchangepedia.com/2006/11/exchange-server-2007-bulk-creation-of-mailboxes-using-exchange-management-shell.html

Adding Users to Sharepoint

Adding Users from Active-Directory into Sharepoint is done in 2 steps. First we will need to Get the information required from Active-Directory and then we need to Add the informtaion into Sharepoint.
Lets start with Active-Directory. Below is an image of the Active-Directory Design in this example:
active-directory-01
Since we want to Get the User information we need to connect to the correct OU through ADSI. The Connection string to the User OU that we want to access would look like this
LDAP://OU=Site1 Users,OU=Site1,OU=Sites,DC=BPA,DC=CORP
Here’s how to connect to the OU through PowerShell:
PS > $ConnectionString = "LDAP://OU=Site1 Users,OU=Site1,OU=Sites,DC=BPA,DC=CORP"
PS > $AD = [adsi]$ConnectionString
PS > $AD
distinguishedName
-----------------
{OU=Site1 Users,OU=Site1,OU=Sites,DC=bpa,DC=corp}
This shows that we have connected to the correct OU. To retrieve information about the Users in the OU we have to access the children within the object.
PS > $AD.PsBase.Children
distinguishedName
-----------------
{CN=user1,OU=Site1 Users,OU=Site1,OU=Sites,DC=bpa,DC=corp}
{CN=user2,OU=Site1 Users,OU=Site1,OU=Sites,DC=bpa,DC=corp}
{CN=user3,OU=Site1 Users,OU=Site1,OU=Sites,DC=bpa,DC=corp}
{CN=User4,OU=Site1 Users,OU=Site1,OU=Sites,DC=bpa,DC=corp}
Now that we have all the Users in the OU we can start collecting the information. But first let’s check what we need. The User items in WSS 3.0 have a couple of settable values and not all values are available Properties in Active-Directory.
sharepoint-05
Sharepoint actually looks up Department and Job Title if they exist in Active-Directory so we dont have to bother about that. What we do need is the Users loginname, mail and name.
To retrieve the information, we will create a filter that takes the information from Active-Directory.
PS > filter UserProperties {
     $_ | select @{ name='sAMAccountName'; Expression={$_.sAMAccountName} },
     @{ name='mail'; Expression={$_.mail} },
     @{ name='displayName'; Expression={$_.displayName} }
 }
Next we will run through all Child objects in the OU and filter them into a new Custom Object.
PS > $User = $AD.PsBase.Children | UserProperties
PS > $User
sAMAccountName                          mail                                    displayName
--------------                          ----                                    -----------
user1                                   user1@mail.com                          user1
user2                                   user2@mail.com                          user2
user3                                   user3@mail.com                          user3
user4                                   user4@mail.com                          User4
Now that we have the User information stored in a PowerShell object, we can use it to create the users in Sharepoint. When adding users to Sharepoint, we have to consider which Role ther Users should have. there are a few available roles to choose from. We can get a list of all roles through the Roles Property.

ps > [System.Reflection.Assembly]::LoadWithPartialName("Microsoft.SharePoint")

PS > $SPSite = New-Object Microsoft.SharePoint.SPSite("http://wss"); $OpenWeb = $SpSite.OpenWeb(); $OpenWeb.Roles | Select Name, Description; $OpenWeb.Dispose(); $SPSite.Dispose()


Name                                                        Description
----                                                        -----------
Full Control                                                Has full control.
Design                                                      Can view, add, update, delete, approve...
Contribute                                                  Can view, add, update, and delete.
Read                                                        Can view only.
Limited Access                                              Can view specific lists, document libraries...
In this example, we will use the Read Role. To add the users to Sharepoint we use a function.


function Add-SPUser([string]$url, [string]$Role, [string]$Domain, [string]$sAMAccountName, [string]$Mail, [string]$DisplayName) {

  [System.Reflection.Assembly]::LoadWithPartialName("Microsoft.SharePoint")

  $SPSite = New-Object Microsoft.SharePoint.SPSite($url);
  $OpenWeb = $SpSite.OpenWeb(); $OpenWeb.Roles | Select Name, Description; $OpenWeb.Dispose(); $SPSite.Dispose()

  $OpenWeb.Roles[$Role].AddUser(
    $Domain + $sAMAccountName,
    $Mail,
    $DisplayName,
    ""
  )
  $OpenWeb.Dispose()
  $SPSite.Dispose()
}

PS > $User | foreach-object {
  Add-SPUser -url http://wss -Role Read -Domain bpa -sAMAccountName $_.sAMAccountName -Mail $_.Mail -DisplayName $_.DisplayName
}

Now the users are added to Sharepoint. Note that Job Title and Department are added automatically, if the values exist in Active-Directory.
sharepoint-06

Reference:
http://www.powershell.nu/2009/01/06/adding-users-to-sharepoint/

Tuesday, March 1, 2011

Exchange and Autodiscover

Using the Exchange Management Console you configure the Client Access Server, or you use the Exchange Management Shell using the following commands.

Set-OWAVirtualDirectory –Identity ServerName\OWA (default web site) -ExternalURL https://webmail.inframan.nl/OWA

Set-OABVirtualDirectory –Identity ServerName\OAB (default web site) -ExternalURL https://webmail.inframan.nl/OAB

Set-WebServicesVirtualDirectory –Identity ServerName\EWS (default web site) -ExternalURL https://webmail.inframan.nl/ews/exchange.asmx

Set-ActiveSyncVirtualDirectory –Identity X2007SRV\Microsoft-Server-ActiveSync (default web site) -ExternalURL https://webmail.inframan.nl/Microsoft-Server-ActiveSync

If you are running Exchange Server 2010, this setting is needed as well:

Set-ECPVirtualDirectory –Identity 2010CAS\ECP (default web site) -ExternalURLhttps://webmail.inframan.nl/EC


Reference:
http://www.msexchange.org/articles_tutorials/exchange-server-2010/management-administration/exchange-autodiscover-part2.html
Now these are for the External URL. When Outlook connects to the Client Access Server it determines whether it is an internal or an external connection. So we also have to configure the internalURL property.

By default the internalURL is configured with the local servername, like https://ServerName.e2010.local/OAB, for example.

This is caused by the fact that the internal server name is returned from the SCP. The Outlook client tries to access this internal servername using HTTPS (remember it is a web service after all) but the internal name is not in the certificate.

You can solve this by changing the internalURL property with the value of the externalURL. You can do this using the Exchange Management Console and changing the properties of the Client Access Server:


You can also use the Exchange Management Shell to change these settings by entering the following commands:

Set-OWAVirtualDirectory –Identity X2007SRV\OWA (default web site) -InternalURL https://webmail.inframan.nl/OWA

Set-OABVirtualDirectory –Identity X2007SRV\OAB (default web site) -InternalURL https://webmail.inframan.nl/OAB

Set-WebServicesVirtualDirectory –Identity X2007SRV\EWS (default web site) -InternalURL https://webmail.inframan.nl/ews/exchange.asmx

Set-ActiveSyncVirtualDirectory –Identity X2007SRV\Microsoft-Server-ActiveSync (default web site) -InternalURL https://webmail.inframan.nl/Microsoft-Server-ActiveSync

And again, this setting is only valid for Exchange Server 2010:

Set-ECPVirtualDirectory –Identity 2010CAS\ECP (default web site) -InternalURLhttps://webmail.inframan.nl/ECP

Now the Client Access Server will always use the external URL webmail.inframan.nl, whether the request comes from the internal network or from the outside (the Internet).

DNS

How do you prevent internal Outlook clients to connect to the Internet (i.e. webmail.inframan.nl) instead of the internal side of the Client Access Server? Normally webmail.inframan.nl resolves to 83.161.229.15, but internally you want it to resolve to internal address, for example to 10.0.0.207 which is the internal IP address of the Client Access Server.

To accomplish this you have to implement something which is known as ‘split DNS’. Besides the external DNS, you create an internal DNS zone named ‘inframan.nl’ and point the servers to the internal servers. In this case both the webmail.inframan.nl and the autodiscover.inframan.nl are resolved to 10.0.0.207 instead of 83.161.220.15


So, you have configured everything the way you want it to be, but still you get this error message as shown in Figure 1. It is a certificate warning, so you can check the IIS Log File on the Client Access Server.

Outlook 2007/2010 checks the autodiscover configuration every 15 minutes for changes in the infrastructure. And again you have the InternalURL property. But this time it’s not on the Autodiscover Virtual Directory. When you check the Autodiscover Virtual Directory details you’ll see that both the InternalURL as well as the ExternalURL property are empty:

Changing these properties doesn’t have the desired effect. For changing the internalURL settings you have to modify the Client Access Server properties. Enter the following command in an Exchange Management Shell:

Get-ClientAccessServer –Identity X2007SRV | Set-ClientAccessServer
–AutodiscoverServiceInternalUrihttps://autodiscover.inframan.nl/autodiscover/autodiscover.xml


Everything should be fine now.


CAS ARRAY

And what role does the CAS Array play in the Autodiscover story? The CAS Array is implemented when you have multiple Client Access Servers in a load balanced scenario. Outlook clients connect to a Client Access Server instead of a Mailbox Server for retrieving Mailbox information. This is achieved using the RPC protocol and not using the HTTPS protocol. Think about Outlook 2003 which doesn’t use HTTPS at all. The CAS Array is also used as a ‘backlink’ from the Mailbox Databases to the Client Access Servers. Mailbox Databases have a RPCClientAccessServer property which links a Mailbox Database to a CAS Server. This is also based on the RPC protocol.

The first step is to create a NLB cluster on your Client Access Server and give the cluster a name, for example nlb.labs.local. If you are using Client Access Servers running on Hyper-V (or VMWare) you have to be aware of the MAC address issue. Hyper-V has a range of MAC addresses being used by Virtual Machine. When you create an NLB cluster a random MAC address for the NLB address is generated, and this MAC address is not recognized by the Hyper-V Servers. More information on how to configure this can be found in Microsoft knowledge base article 953828.
Now you can add the CAS Array to the Exchange configuration, and the only option is to use the Exchange Management Shell. Enter the following command:

New-ClientAccessArray -FQDN webmail.inframan.nl -Name CAS_Arrary

The CAS Array will be added to the Exchange configuration, and it Fully Qualified Domain Name is “webmail.inframan.nl”. Your Outlook clients can now use “webmail.inframan.nl” as the Exchange Server using RPC.

Newly created Mailbox Databases will use the CAS Array as the RPC Proxy, but existing Mailbox Database will use the individual Client Access Servers as the RPC Proxy. To change the –RPCClientAccessServer property on all Mailbox Database in one time, open the Exchange Management Shell and enter the following command:

Get-MailboxDatabase | Set-MailboxDatabase –RPCClientAccessServer “webmail.inframan.nl”


Thursday, February 24, 2011

Using PowerShell to import test users into Active Directory

If you build a lot of virtual SharePoint environments, you might find yourself needing some test users in Active Directory to demonstrate various things such as people search or the new social features.  Sure, you can create these users by hand, but that’s very tedious.  I decided to look for a programmatic way to do it.  After searching the web, I found various approaches but many of them were antiquated using things like .vbs files.  I wanted something a bit more modern.  I wanted something in PowerShell.  I stumbled upon a post by Todd Klindt which set me in the right direction.  For my needs though, I needed to expand this approach just a little bit more.  I want to demonstrate the Organization Brower, so I need to set the user’s manager, title, and department properties.  Setting the manager property turned out to add a little bit of complexity.
Before, we can work with Active Directory in PowerShell, we have to import the Active Directory module.  This module is large enough to load that you actually get a progress indicator.  Load it by typing the command below.
Import-Module ActiveDirectory
To do this, I will create a .csv file that has all of my users but one.  I ran into one minor issue putting all of my users in it.  If you specify the manager property on the PowerShell command we use, it requires a value and it has to be an existing user.  This proved to be a problem for my fictitious CEO who did not have a manager.  So let’s create my CEO first.  His name is John Williams (real original I know).  We will also use this as an opportunity to look at the various parameters to the New-ADUser command which creates our new account in Active Directory.
New-ADUser -SamAccountName "john.williams" -UserPrincipalName "john.williams@sharepoint.local" -Name "John Williams" -DisplayName "John Williams" -GivenName "John" -SurName "Williams" -Title "CEO" -Department "Executive" -Path "OU=Test Users,DC=sharepoint,DC=local" -AccountPassword (ConvertTo-SecureString "test41;" -AsPlainText -force) -Enabled $True -PasswordNeverExpires $True -PassThru
The New-ADUser commandlet has a lot of options.  Only a few are required but we need to specify a few more so that when these accounts are imported into the profile store all fields are fully populated.  Some of the information may seem redundant but it has to be set.  When you create a new user through the Active Directory Users and Computers MMC snapin, it takes care of a lot of these defaults for you.  When you create an account with PowerShell though, you have to set it yourself.
Let’s look at the parameters now.  SamAccountName is the traditional NT4 login name that you have come to think of.  When logging in with a DOMAIN\USERNAME, it is the USERNAME.  UserPrincipalName is not required but it is the Windows 2000 style login that looks like an E-mail address.  Name is required and this is the name of the actual object in Active Directory (typically the user’s full name).  DisplayName is optional but it should be specified because the User Profile Store in SharePoint uses it.  If you don’t set the Display Name, none of your imported users in SharePoint will show a name.  Many of the other parameters correspond to property names in Active Directory.  GivenName is the first name.  SurName is the last name.  AccountPassword is the user’s password and has to be specified using the CovnertTo-SecureString commandlet.  In this case I am using the password test41;. 
You might have noticed I skipped a few parameters.  The rest really are completely optional.  I just specified them because I want them to show up in People Search.  This includes Title, Department, and Manager.  I want my test users in a specific OU in my Active Directory, so I specify the path in LDAP notation with the Path parameter.  Lastly, you need to enable the account with the Enabled parameter and for test accounts I recommend using PasswordNeverExpires. 
If you want more information on how to use New-ADUser, don’t forget you can use the Get-Help commandlet like this:
Get-Help New-ADUser
Now we’ll look at my CSV file.   Here is what mine looks like.  I simply started at the top of the org chart and added the users down the tree.

SamAccountName,Name,GivenName,SurName,Title,Department,Manager
christina.murphy,Christina Murphy,Christina,Murphy,CFO,Accounting,john.williams
frank.alcock,Frank Alcock,Frank,Alcock,CIO,Information Technology,john.williams
anna.stevenson,Anna Stevenson,Anna,Stevenson,Chief Legal Counsel,Legal,john.williams
joy.williams,Joy Williams,Joy,Williams,Director,Human Resources,john.williams
craig.johnson,Craig Johnson,Craig,Johnson,Accountant,Accounts Receivable,christina.murphy
jennifer.evans,Jennifer Evans,Jennifer,Evans,Accountant,Accounts Payable,christina.murphy
michael.adams,Michael Adams,Michael,Adams,IT Director,Information Technology,frank.alcock
chris.white,Chris White,Chris,White,Administrator,Help Desk,michael.adams
binh.le,Binh Le,Binh,Le,Technician,Help Desk,chris.white
paul.smith,Paul Smith,Paul,Smith,Director of Application Development,Application Development,frank.alcock
jose.cuervo,Jose Cuervo,Jose,Cuervo,Developer,Application Development,paul.smith
preet.ramakrishnan,Preet Ramakrishnan,Preet,Ramakrishnan,Junior Programmer,Application Development,paul.smith
richard.jackson,Richard Jackson,Richard,Jackson,Team Lead,Application Development,paul.smith


The way PowerShell can read CSV files is quite cool.  It automatically recognizes the header columns in the document and assigns them to variables that you can use with $_.  For example, the name column in the CSV file can be accessed with $_.name.  If you want to set other properties on AD user accounts, you can simply add them to your CSV file and set them later on your PowerShell command.  To import the CSV file into PowerShell, use the Import-Csv command.
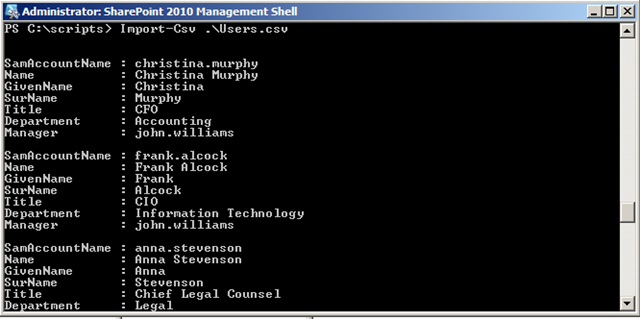
Import-Csv .\users.csv
Executing this command by itself will display what it read from your file so that you can verify everything looks correct.  Here is what it looks like.
PowerShellImportCsv
If you are happy the way it looks.  We can then go to the next step by using the foreach-object command to create a new user for each row it found in the CSV file.  I’ll show what the rest of the script (contained in a .ps1 file) looks like and then I’ll explain what is going on.
Import-Csv .\users.csv | foreach-object {
$userprinicpalname = $_.SamAccountName + "@sharepoint.local"
New-ADUser -SamAccountName $_.SamAccountName -UserPrincipalName $userprinicpalname -Name $_.name -DisplayName $_.name -GivenName $_.GivenName -SurName $_.SurName -Manager $_.Manager -Department $_.Department -Path "OU=Test Users,DC=sharepoint,DC=local" -AccountPassword (ConvertTo-SecureString "test41;" -AsPlainText -force) -Enabled $True -PasswordNeverExpires $True -PassThru }


We start by doing the import and then piping its output to the foreach-object command.  Remember, when the .csv is imported the names of the columns (specified in the first row of the CSV automatically become variables that can be access with $_.  For example to get the user’s department I would do $_.Department.   As I mentioned above, I wanted to set the user principal name so I create this name by concatenating my domain name @sharepoint.local to the name of the SamAccountName specified in the .CSV file.  I then pass each variable to the corresponding parameters as you see above.  It executes this once for each row in the file until all my accounts are created.
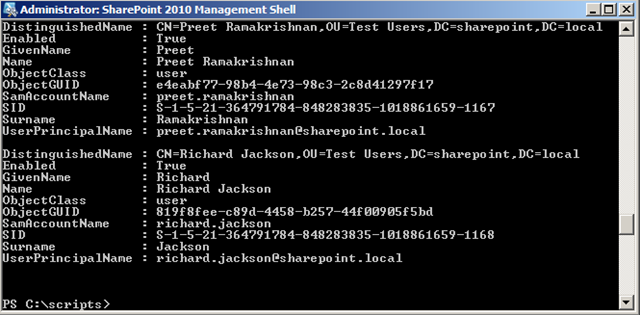
That’s really all there is to it.  Save your script as a .ps1 file and execute it in PowerShell.  If all goes well, you should see a screen that is similar to the one below.
PowerShellImportUsers2
When building your own user import file, remember that if you are setting the manager property, that the manager’s account has to exist in Active Directory before you set that property on employee accounts.  I hope this PowerShell information is useful.  Feel free to use my fictitious employees.  If you add some to the list, feel free to share them. :-)

Reference:
http://dotnetmafia.sys-con.com/node/1457593/mobile

Move Exchange 2010 Trasport Queue

My recommendation will be to use the script as it takes care of the steps needed.
  • The script will create the folder if it doesn’t already exist.
  • It will give the necessary accounts the correct permissions on the folder. ( Full control for Network Service, System & Administrators).
  • It will move the transport database (Mail.Que) and log files to the new drive.
  • It will restart the transport service for the changes to take effect.
  • Editing the config files doesn’t move the transport database & log files. It just updates Exchange to use the new drive once the service is restarted.
The command to move the transport queue is the same in both 2007 & 2010.
./Move-TransportDatabase.ps1 –QueueDatabasepath “path” –QueueDatabaseLoggingPath “path”


Reference:
http://www.howexchangeworks.com/2010/08/moving-transport-queue-in-exchange-2010.html

Wednesday, February 23, 2011

Microsoft Exchange SP1 Changes

Port Problems

Q: As we make plans to upgrade our Exchange 2010 production environment to Exchange 2010 SP1 when it’s released later this year, we’ve been testing the Exchange 2010 SP1 beta version in our sandbox. We have four Exchange 2010 Client Access Servers in a CAS array. We load balance Exchange client traffic across the CAS servers using a hardware load balancer from a third-party vendor. We’ve also assigned static RPC ports for the RPC Client Access service and Exchange Address Book service.
After we began using Exchange 2010 SP1, we’ve had a variety of issues connecting to a mailbox using Outlook. We have also had issues opening the Address book from Outlook. We don’t seem to have these issues when using OWA. Have you seen this or at least have an idea of what could cause this behavior?
A: With the Exchange 2010 RTM version, you would’ve assigned a static RPC port for the RPC Client Access service by adding a DWORD key named “TCP/IP Port” in the registry. This would be under: HKEY_LOCAL_MACHINE\SYSTEM\CurrentControlSet\Services\MSExchangeRpc\ParametersSystem. You would’ve also assigned a static RPC port for the Exchange Address Book service using the Microsoft.exchange.addressbook.service.exe.config file from in the “Bin” folder located in the Exchange 2010 installation folder.
With Exchange 2010 SP1, things have changed a bit when it comes to assigning a static port to the Exchange Address Book service. To prevent Exchange setup from overwriting the custom values entered in the Microsoft.exchange.addressbook.service.exe.config file and make this configuration step more consistent with how you assign a static RPC port for the RPC Client Access service, the Exchange Product group decided to move this configuration option to the registry.
If you open the Microsoft.exchange.addressbook.service.exe.config file after upgrading a Client Access Server to Exchange 2010 SP1, you no longer see the

as you can see in Figure 1.
Figure 1 With Exchange 2010 SP1, you no longer assign static port for the MSExchangeAB in a config file
Figure 1 With Exchange 2010 SP1, you no longer assign static port for the MSExchangeAB in a config file.
With Exchange 2010 SP1, you assign a static RPC port for the Exchange Address Book service by drilling down to HKEY_LOCAL_MACHINE\SYSTEM\CurrentControlSet\services\MSExchangeAB. Here you need to create a new key named “Parameters” (not ParametersSystem). Under this key, you create a new REG_SZ string (not a DWORD) named “RpcTcpPort” and specify the RPC port number you want to assign to the service, as shown in Figure 2.
Figure 2 With Exchange 2010 SP1, you assign a static port for the MSExchangeAB in the registry
Figure 2 With Exchange 2010 SP1, you assign a static port for the MSExchangeAB in the registry.
It’s important to note that any current static RPC port you’ve assigned to the Exchange Address Book service using the Microsoft.exchange.addressbook.service.exe.config file won’t automatically be converted into a registry. You need to do this manually after upgrading to Exchange 2010 SP1. It sounds like this is what’s causing the issues you’re having when connecting to a mailbox with Outlook.

Importing and Exporting Mailboxes

Q: With Exchange 2007 SP1, we had the Import-Mailbox and Export-Mailbox cmdlets that we used to import or export data to or from PST files. Although these two cmdlets replaced the good old ExMerge tool, there were demanding requirements.
In order to use the cmdlets, you had to install the 32-bit version of Exchange 2007 SP1 Management tools, as well as Outlook 2003 SP2 or later, on a dedicated server or workstation. The MAPI provider included with Exchange 2003 and earlier had been removed from Exchange 2007.
Based on what I see, the Exchange 2010 RTM still uses the Import-Mailbox and Export-Mailbox cmdlets. Although the support for remote Windows PowerShell improves things a little by letting you run these cdmlets on a desktop or server without the Exchange 2010 Management tools installed, you still need to install Outlook 2010 64-bit on the Mailbox server itself. The cmdlets also seem somewhat error-prone in Exchange 2010.
Does Exchange 2010 SP1 make any improvements in regard to how you import and export mailbox data to and from PST files?
A: The short answer is yes. There’s a lot changing in this area. The long answer is also yes. With Exchange 2010 SP1, two brand-new cmdlets—MailboxImportRequest and MailboxExportRequest—have replaced the old Import-Mailbox and Export-Mailbox cmdlets.
Even better, the Exchange Product group also thought it was a good idea to get rid of the Outlook 2010 MAPI provider requirement. Exchange 2010 has its own MAPI provider, and those two new cmdlets take advantage of the Exchange Mailbox Replication Service (MRS). You can import or export data via an asynchronous process, just like when you move mailboxes using the New-MoveRequestcmdlet (see Figure 3).
So if I want to import a PST file to an Exchange 2010 SP1 mailbox, the command looks something like this:
Figure 3 Importing data from a PST file to an Exchange 2010 SP1 mailbox
Figure 3 Importing data from a PST file to an Exchange 2010 SP1 mailbox.
Notice that you now point to a UNC, not a local folder on the server upon which the cmdlet is run. This also has several benefits.

Archiving Answers

Q: With Exchange 2010 RTM, we couldn’t import a PST file directly to the online archive of an Exchange 2010 mailbox. Instead, we had to first import the data to the primary mailbox, and from there drag and drop the content (or use retention policies) to the online archive.
Do you know if this will change with Exchange 2010 SP1?
A: As explained in the previous answer, a lot of stuff is changing when it comes to importing and exporting mailbox data to and from PST files. The same is true of importing and exporting data to and from an online archive.
Using the same cmdlets (MailboxImportRequest and MailboxExportRequest), you can now move data in and out of an online archive (as in Figure 4). Instead of the command I provided in the last answer, you use something like the following to import data directly to the online archive:
Figure 4 Importing data from a PST file to an Exchange 2010 SP1 online archive
Figure 4 Importing data from a PST file to an Exchange 2010 online archive.

Avoiding Forced Restarts

Q: With Exchange 2010 RTM, a user can work in his mailbox while it’s being moved between two Exchange 2010 mailbox databases or between an Exchange 2007 SP2 and an Exchange 2010 RTM mailbox database. As you can see in Figure 5, though, at the end of the move, the user was told to quit and restart Outlook in order to apply the recent changes.
Figure 5 Outlook restart triggered by Exchange 2010
Do you know if Microsoft has done any further work in this area in regard to Exchange 2010 SP1? The dialog box in Figure 5 is a minor annoyance for an end user, so it would be awesome if they could remove this step.
A: That’s a good question, and yes, there actually has been some work in this area. With Exchange 2010 SP1, if you move a mailbox between two Exchange 2010 SP1 databases, the user usually won’t receive an “Outlook must be restarted” dialog box unless:
  • The RpcClientAccessServer property is different between the two involved mailbox databases. (This is usually the case when you don’t use a CAS array.)
  • If you move a mailbox between a source mailbox database in Active Directory site 1 (with one CAS array configured) to a target mailbox database in Active Directory site 2 (with another CAS array configured).
  • If the named properties for the mailbox is reset using the DoNotPreserveMappingSignature parameter when running the New-MoveRequestcmdlet.
If you move a mailbox between Exchange 2003/2007 and Exchange 2010 SP1, you’ll still have to restart Outlook.

Staying in Control

Q: We’ve just upgraded from Exchange 2003 to Exchange 2010 RTM. So far, we really like the features of this version—especially the new Exchange Control Panel (ECP). However, we’re facing a problem with the ECP. Besides their normal mailbox-enabled user accounts, our IT personnel have another admin account. Our IT policy dictates that mailbox-enabled admin accounts aren’t allowed within the organization. Our testing shows that in order to access the ECP, you must log in with a mailbox-enabled account.
We were wondering if you know of any workarounds in regard to this limitation? We really would like to use the ECP for many Exchange 2010-related administrative tasks.
A: Early on in the development stages of Exchange 2010, the development team decided an account accessing the ECP needed an Exchange 2010 mailbox. The primary reason for this decision was the engineering effort required to support a scenario where both non-mailbox-enabled accounts and mailbox-enabled accounts would have access to the ECP. Allowing that access would result in different code paths, which again would mean increased complexity/test costs. So the Exchange Product group decided to set this limitation and concentrate on providing actual features in the GUI. So yes, the Exchange 2010 RTM version requires any user/admin accounts that access the ECP be mailbox-enabled.
As most of you know, the Exchange Product group takes all feedback from the community and its customers very serious. In fact, many feature changes were made based on that feedback. Since the release of Exchange 2010 RTM, the Exchange group has learned many organizations have IT policies in place similar to yours. So it’s great to be able to tell you that when Exchange 2010 SP1 is released later this calendar year, that requirement will be gone.
With Exchange 2010 SP1, you will be able to log on directly to the ECP (https://mailcontoso.com/ecp) with a non-mail and non-mailbox-enabled AD user account (Figure 6).
Figure 6 Opening ECP using a non-mail or non-mailbox-enabled AD user account

The Rhyme and Reason of Repair

Q: Our organization has upgraded from Exchange 2007 to Exchange 2010. Occasionally, we need to perform offline repairs on mailbox databases. We wanted to ask if you still need to run ISInteg after having repaired a mailbox database, as in previous versions of Exchange Server?
What should those of us who occasionally need to detect and repair mailboxes in an Exchange 2010 Mailbox database do? With Exchange 2010 the Exchange Product group is moving away from ISInteg. In Exchange 2010 SP1, we’ll have a brand-new cmdlet called New-MailboxRepairRequest. This replaces the ISInteg tool. You can run this cmdlet against one or more mailboxes asynchronously while the mailbox database in which they’re located is mounted. Bear in mind, though, that the mailboxes being repaired using this cmdlet will be disrupted.
To detect and repair folder views, we would use something like the following:
Figure 7 Running the new Mailbox Repair cmdlet against a mailbox
You can also run the cmdlet against a mailbox database, but your access to all mailboxes in that database will then be disrupted until you’ve finished the repair process


Reference:

http://technet.microsoft.com/en-us/magazine/ff943663.aspx

Copy Code
New-MailboxRepairRequest -Mailbox HEW -CorruptionTypeFolderView


Copy Code
New-MailboxImportRequest -Mailbox HEW –IsArchive-FilePath\\EX02\PSTFileShare\HEW.pst


Copy Code
New-MailboxImportRequest-Mailbox HEW -FilePath\\EX02\PSTFileShare\HEW.pst


Copy Code
<add key="RpcTcpPort" value="static_port" />